Thursday, June 13, 2013

Winter Wardrobe: Transport and Sport


I get a lot of requests for a comprehensive winter wardrobe post. Since it snowed again today, this seemed like a good time. I won't call this a "guide" and I don't assume that what works for me will necessarily work for others. But in the midst of Winter 4.0, this is the stuff that keeps me comfortable cycling even on the coldest days in greater Boston. For reference, our temperatures are typically in the 20s-30s F range, although it does occasionally get colder.


A few quick disclaimers: I am dividing this into "transport" and "sport" sections, because for me the two rarely intersect, not because I think others must keep them separate. Also, you will find that some things here are female-biased, because, well I am female. Finally, I linked to some companies and products, because readers tend to ask for specifics. As always, none of the product mentions are endorsements or "monetised" in any way; they are just there for your info.


Winter 4.0 (Transport)
TRANSPORT

Pictured here is the sort of thing I normally wear when getting around by bike, either for work or errands. I will start from the inside out.


Underwear

Worn closest to the body, underwear plays a crucial role in temperature regulation. So before I worry about bundling up, I make sure to get this part right. In my experience, underwear made of wool, silk, lycra/spandex and some technical polyester-based fabrics, is generally good at regulating body temperature and wicking moisture. Underwear made of cotton or acrylic is not. Out of the fabrics that work I prefer wool and most of my undergarments are from Ibex: I like their modern and stretchy wool/lycra blend. Icebreaker and Smartwool also offer some good options, as does Winter Silksif you're looking for budget-friendly silk.


Everyday Outfits

My everyday clothing ranges from casual to formal, but, especially in winter, it almost always involves skirts and dresses. This is because I find it easier to add warm layers under a skirt (wool leggings or legwarmers over tights), than to deal with layering under trousers or jeans. Also, if it rains or snows, tights with knee-high boots are a highly effective way to keep dry. After several winters of experimenting, most of my cold-weather outfits are now wool. I knit wool skirts myself in variety of styles. And I wear wool sweaters over wool or silk base layers. 100% merino is harder to find now in mainstream stores than it used to be, but J. Crew remains a good source and they have frequent sales (like right now). I also alternate between several wool dresses, mostly handmade. And I still own a few wool skirt-suits from my suit wearing days.If I want to wear an outfit that is made of a non-temperature regulating fabric, I will wear a wool or silk baselayer under it and it'll be fine. But to me, wooly stuff just feels overall warmer and cozier.


Tights

When buying cold-weather tights, I look for wool and nylon/ lycra/ spandex content, and I avoid cotton and acrylic content - because, as with baselayers and underwear, the latter does not wick moisture or regulate temperature well. Smartwoolmakes decent all-around winter tights (and socks). Falke is a European favourite, but expensive. Another option is to wear dense nylon tights (such asthese), with wool leggings or legwarmers over them, which can be later removed indoors.


Footwear

Both on the bike and off, I am a fan of waterproof boots rated for freezing temperatures. For years, I have been wearing La Canadienne boots that are exactly that. I have a pair of their ankle boots and a pair of knee-high boots that look reasonably professional and feminine, while being absolutely winter-proof. The soles have excellent traction on snow and ice, which is also useful for when my bike pedals turn slippery. With the knee-high boots, the additional benefit is that they keep my legs extra warm, and protected from slushy splash-back.


Coats

On the bike, I favour wool 3/4 length coats with an A-line shape, so that the hem does not constrict pedaling. The coat should fit loosely enough to allow layering underneath, and should not in itself be too warm. When I am walking, I will sometimes wear a down-filled coat, but I find it too bulky when cycling. The down-filled coats can also be slippery on the bike saddle, whereas wool coats stay put. My current coat is about 6 years old and I no longer remember where I bought it.


Hats

Usually I wear a wool beret or hat that I knit myself. I take care that the stitching is dense enough to be wind-proof, and that the hat covers my ears.


Gloves

My favourite gloves for cycling are wool and grippy. They are perhaps not the most elegant choice, but their functionality has won me over.


Scarves

After some experimenting, I have taken to wearing a shawl-like wool scarf which I wrap around my neck once and then tuck the rest into the front of my coat for an extra layer of warmth over the chest. This really helps when cycling against an icy headwind. Beware of long, flowing scarves on the bike,for obvious reasons.


Want more winter wardrobe advice from genuine cycling fashionistas? Dottie of Let's Go Ride a Bike has excellent tips from snowy Chicago. Here is her latest post on the topic and a more general guide for winter dressing. Also, this excellent Bikeyface post will not disappoint.


Winter 4.0 (Sport)
SPORT

With roadcycling, I find getting dressed in the winter easier, simply because there is less creativity required. I can wear the same thing over and over! Here is my formula:


Base Layers

I like thin, long sleeve wool base layers. There are many options to choose from now.Rivendell has come out with a nice US-made one recently. I also wear a wool/lycra sportsbra underneath (see "Underwear" earlier).


Tights

In winter temperatures, I wear fleece-lined full length tights. I have triedbib tights, but ultimately I find them too fussy to get in and out of. I prefer the padded winter waist-high tights from Capo, and wear a model from a few seasons ago. In addition to being super warm, these are also somewhat water resistant. I have made do without rain or snow pants so far, and have not felt the need for them.


Socks

I love the simplicity and longevity ofDeFeet wool socks. Of all the wool and wool-blend socks I've tried; they have been the most durable. When it gets particularly cold, I wear two pairs.


Mid Layers

My midlayer is a winter-weight long sleeve cycling jersey. As long as I wear a wool baselayer, it does not matter to me what the midlayer jersey is made of, as long as it insulates. I own a few now, but my favourites have become the wool/poly blends from Rapha and Shutt Velo Rapide. These are wool on the inside, with some high-tech poly coating on the outside. I do not like how they feel against the skin, but as midlayers I find that they offer the best temperature regulation.


Outer Layers

Winter outer layers are tricky. A windbreaker/shell type jacket is not enough. A jacket that's too warm can be even worse. Last winter I bought a Rapha winter jacket on the recommendation of some of the women I rode with, and it is just right, even for the coldest temps around these parts. This is a painfully expensive jacket, but it does go on sale occasionally and stalking it was worth it.


Gloves

DeFeet Duraglove. I have tried fancier and supposedly more weather-proof gloves, but prefer the DeFeets. Gosh, I hope they never discontinue these.


Neck Warmers

These are called various things, depending on the manufacturer, including neck gaiterandcollar. I have a few and find them very useful. For extremely cold rides, I have tried a balaclava, but it is not my cup of tea; I prefer to wear a neck warmer and pull it over my mouth instead.


Hats, Etc.

I wear a tightly knit wool winter cycling caps with brims and ear flaps. I buy these instead of knitting them myself, because I can't get the weave tight enough by hand; it has to be machine-made. Several companies offer these hats now. I have one from Bicycle Fixation and another from Ibex. I usually wear a helmet on my roadbike, and find that this adds to the cap's warmth, while also helping to keep it firmly in place.


Shoes

I do not own winter cycling shoes at the moment, though I hear there are some wonder-boots from Lake that are pretty good and I might save up for those eventually. I have some overshoes on loan from theRide Studio Cafe, but I have to admit they scare me, so I have yet to try them. Instead I just wear multiple pairs of socks for now. My toes have only frozen a couple of times so far...


Want winter wardrobe advice from more experienced roadies? The Blayleys have an excellent series of posts on this topichere, here and here. As they probably spend more time on the bike in the winter than off, they are the best source I know.


Keep warm and enjoy yourself on the bike this winter, whether in sport or transport!

Wednesday, June 12, 2013

The Scarpa Phantom 6000 review

IT'S BACK! (finally) The 2.5# dbl boot! The Scarpa Phantom 6000


I know, I know, it only took 30 years but we are finally back to a double boot that excels on technical climbing and that weighs in at a svelte 2# 10oz in my size 12 (46) feet. (Poetic license and a cleaner intro on the 2.5# since my size 12s won't make that number. )

I can drop a full pound off my size 12 feet by using these boots!
That is 6.5 off my back by the theory. But do they fit? And how do they climb?

If you missed my previous bitch fest blog post I had been laughing at how both Sportiva and Scarpa...and any one else in the business for that matter...had not yet equaled let alone duplicated the warmth, climbing ability and weight of the 1980 Kolfach Ultra @ 2# 10oz with an Aveolite inner boot. Kinda sad that even though the boots were now in the $700 range. (Buyer hint: wait, be patient and hunt around. If you do not unusual that you can buy any of them on sale for $500 or less. The 6000 went on sale for $70 off retail before I even got the review written! The Internet price for a pair of Spantiks can be as low as $500 from what I have seen.)

Boot weights (Euro size 45 or 11.5/12 US)

La Sportiva Spantik 3# .o5oz
La Sportiva Baruntse 3# 2.5oz


La Sportiva Batura (winter single boot) 2# 7oz
Kolfach Ultra w/Aveolite liners 2# 10oz (vintage 1980)
Scarpa Phantom 6000 2# 10oz


Scarpa Phantom Guide (winter single boot) 2# 7.5oz


I am told the newest boots have sex appeal galore, technology that may or may not work and fit that could go from perfect (and just as likely from reports I get) to dismal.

At the risk of repeating myself here let me back up once again. Super Gators were very good in cold weather. Plastic boots for the most part negated their use and when required out came the neoprene full over boots as the temps dropped. Never the best answer for technical climbing because of crampon fit/or no fit many just do without and risk the cold injury.

The old Phantom 6000 and the Spantik addressed the issues in different ways but basically boots that did not require another add on gaiter to keep your feet warm enough up high and out in the cold.

After seeing the newest versions of the synthetic double boots I have long thought that to gain the warmth we all generally need the boots have gotten too big physically and the fit hasn't gotten any better compared to the older leather double boots.

My preference would be a dbl boot with slightly less volume than the Spantik or the Baruntse, equally as warm and all the while dropping some weight in the process. A warm dbl boot suitable for hard technical climbing made of modern material should be able to get under 2 and 1/2 pounds in my size 12s. With a over-all outside volume closer to the old Koflach and Asolos would be well received by many needing a warm dbl boot. The most modern technology and materials should be able to make a boot of that volume, warmer and lighter that the earlier plastic boots.

One stainless Sabertooth, no bots with Petzl bails 14.2 oz
One Phantom 6000 2# 10oz

Total weight per combo is 3# 8.2oz.

That number betters my 30 year old gold standard of 3# 9oz. of Kolfach Ultra and Chouinard hinged with straps.


Add the need for a real gaiter and different sox weights for the Kolflach and the actual weight savings is even more, or what would have been 9oz or more per foot in my 45s. And a big advantage in climbing ability and warmth with the new Scarpa 6000.

Among other things the over all volume of the boot should give us a clue on the warmth of the boot but so does the quality of the insulation, how dry the insulation stays on the interior, sole insulation and what is keeping the exterior upper dry and clear of snow.


Dbl click on the picture and take a look at the Guide on the right and the 6000 on the left in the picture. The mid sole and lugs are thinner on the 6000. Heel has less material as well. The mid sole on the 6000 is totally different between the two models of boot.


The synthetic materials allow the current boot builders to keep the outer shells dry. But until now a gaiter of some sort is usually required. Several older leather single and dbl boots have had attached gaiters, San Marco, Fabino and Trappeur comes to mind off hand. Scarpa has taken the 8000m technology of a fully integral gaitor that One Sport invented in the '80s and added it to lighter weight boots while making them warmer yet.


The Scarpa Phantom line obviously has a built in, insulated outer/super gaiter that is sealed with a water proof zipper (the TIZIP) and a button snap closure in an elastic top. It is not Scarpa's first zipper rodeo. This is 2nd and maybe 3rd generation on their gaiter and zipper for the Phantom line. And they have continued to made improvements. This version is stout. Stout enough that La Spotiva copied them and are now using the same brand "TIZIP" water proof zipper for their Batura. Simple and effect. But it is still fabric and a zipper so not terribly durable in comparison to some of the old school style boots, a Nepal Evo or Scarpa Mt. Blanc as examples. Scarpa also wisely includes the special TIZIP zipper lube for its maintenance.


Let me discuss durability a bit. Many of the very best cold weather boots do two things to eliminate weight and make the boots warmer. They use a hard foam insole/midsole to help insulate from the ground up. They also make the lug pattern and sole as thin as possible, again to save weight. Scarpa uses both techniques on the 6000 and I think to good effect on this boot.


Neither technique adds durability to the boot. Put a fabric gaiter/outer surface on the boot and you have to start thinking high performance as a cost for long term durability. The nylon material used won't shed a crampon or a sharp rock for that matter. For a boot that will generally be used with crampons and on snow and ice the majority of time they should last "long enough". But they won't last as long as some of the newest synthetic dbls available. Baruntse comes to mind as the the more durable boot of the three discussed here. In my size the cost of durability is an extra full pound on my feet. But is there a difference in warmth between the Scarpa 6000 and the La Sportive flag ship, technical, dbl boots? That observation will have to wait till December I suspect. But it is going to have to be really cold (-20C and below) to feel a difference is my thought on it. If anything I have learned from using Primaloft 1 garments that thickness of the insulation these days doesn't always give you a relative idea of how warm the garment might be in actual use. And the Scarpa 6000 uses Primaloft to insulate the outer boot. Hope for the best....plan for the worst and know your own limitations when it comes to cold feet.

The Scarpa 6000 is a lower profile and more sensitive boot than the Spantik or the Baruntse. The sole and ankle flex are somewhere between the Spotiva models. Defiantly not as stiff of flex as the Spantik...more akin to the Baruntse. It will be a great technical boot on hard terrain and stiff enough for the endless 60 degree alpine ice suffer fests IF you are accustomed to the newest flexable fabric boots. It is better compared to the La Sportiva Batura and the Scarpa Phantom Guide single boots for volume and weight. You can get an idea by that comparison on how they will be on mixed :)

Hard for me to talk about any boot without making comparisons. My current dbl boots are the Spantik, Baruntse and now the 6000. By far the worst fitting inner boot for me is the Spantik. The best is the easily heat formed Baruntse inner boot. The new 6000's inner boot is obviously intended to be a VBL inner boot worn with only a thin sox. The Velcro seals the inner up tightly. Not sure about the extra bumps on the inner boot though and comfort long term. The entry system also makes it a bitch to put on and take off the inner. That entry and the surface finish of the foam inner makes it hard to get in and out of the shell as well. The Spantik's inner is fairly traditional and a lace up. My experience is that the Spantik's eyelets are not durable on the inner or outer boot. The Baruntse has a more modern lace system on the inner. Hard to break or have a failure in that inner boot. The Baruntse is the easiest of the three to use and the most durable. It is the inner I think the Spantik should have been delivered with. It fits better and is lighter in weight. The lace system more closely mimics the Spantik shell system as well but no durability issue. Nice that my Baruntse inner will fit any of the 6000 outer boot. IMO the Baruntse inner is the best of the three for fit and ease of use. It weighs only 1/2 oz more (@6 oz) than the 6000's inner (5.5oz). The Spantiks' inner boot weights 9.0oz.

6000's Velcro sealed, VBL inner boot, and removable foam insole


The 6000's inner boot? Sadly nothing good to talk about here imo. The inner is a bitch...really a bitch... to get into. Part of that is the majority of the inner boot is unlined closed cell foam. Yes, unlined foam. Bare feet and most sox will stick to the foam trying to put them on and take them off. This inner wouldn't last me one 3 week Alaska trip. I would shred it in short order even while trying to be careful. I don't doubt it is very warm......and high tech.....but durable it ain't going to be. And that 44 size insole? Yes my 45s came with a 44 size insole in the inner boot. And the inner boot fits like a 44 as well. My guess? By the fit with this inner boot in place is the 6000 will fit one full size too small. I had actually ordered a 46 the day these arrived just to cover the bases...played with my Baruntse inner boot in the outer boot and decided the 45s would NOT work for me. I ended up with a 46s. The 45 Guides fit OK although a bit narrow in the toe.

There is really only one reason to climb in a dbl. boot. It isn't the warmth generally. Get the right single boot and keep them dry inside and out and you can deal with some terribly cold temps. The problem is doing it day after day and keeping your boots dry in and out and unfrozen. A dbl. boot is the only thing that will allow you to keep your boots dry on the inside because you can dry them in your bag at night as well as keep them from freezing. So the added warmth is great but the real reason is dry boots. Dry boots and dry sox means warm feet. No one actually enjoys climbing in double boots (any of them) ...they are all huge and they are all heavy. But way less stress in the cold mountains...with a good double boot.


Of the three boot shells the Baruntse is the only traditionally laced outer boot. Simple and effective system to get a good fit in that boot. Very durable and reliable. From my limited experience if you have problems with fitting boots the Baruntse is the boot most likely to fit. Still it can take 3 men and a boy to lace them tight enough. The Spantik has a lace system you either love or hate. I can't get my ankle tight enough without some serious effort. Too much effort in really cold conditions where the system should make things easier. Sper thin laces are rough on your hands. Inner and outer eyelets are fragile. I personally went through three pair of Spamtiks before having a "solid" pair now. Because of the lacing issue I end up with heel lift in the Spantik if I am not extremely careful adjusting the laces. Get tired and cold and not adjust the boots perfectly and I'll get heel lift going up and toe bump going down in the Spantik. So I am on the hate side of that discussion. Boots do climb well though....so I have used them on things that are cold and challenging for me.


The 6000 has an interesting lace system. My old Koflach inners were a slip on with only a Velcro strap across the top locking the tongue in place. On the 6000 you lace the outer shell to one eyelet above the angle and it locks with a mechanical lace lock...sweet system btw and very easy to use even cold or tired from what I can see so far. (see the pictures for details on the lock) By far the easiest of the three outer boots to lace tightly. It really is trick and so far if my Guides are an example the lock system is durable/reliable as well. Above the lace system is a single Velcro "power band" strap that closes the rest of the outer shell. It also controls just how stiff the boot will be and how much heel hold down you'll have by how tight you wrap that strap. Easy to go over board on either lace system and really crank the 6000 down, till it is way too tight. For me that says I'll be able to get it tight enough in the mountains when required. And it is really easy to do. A lot less toe bump or heel lift as the end result. I'm stoked on that! Velcro does wear out...but not quickly and it will be easily replaceable on this strap. But there is a lot of Velcro (1" x 4") and I suspect the boots will be toast before you have to replace the 1" x 4" hook and 1" x 4" loop that mates up on the "power strap".


Toe bump? Generally toe bump is either a too small of boot or not a tight enough boot. When I first tried the 6000 on I had just gotten off a 5 mile ridge traverse with another couple of miles of walking so I had some pretty swollen feet. I thought the sizing was at least a full size too small. Turns out I wear a 45 from Sportiva and a tight 45 in the new Scarpa Guide and a 46 in the 6000.

As I reviewed this post I was looking at the pictures and noted that the insole of the inner boot that I have flipped over in the picture above is marked "44". Sneaky bastards......... When I first pulled the 6000 out of the box it took me 10 seconds flat to figure out I didn't like the Scarpa inner boot so I didn't look at it very closely or try to get a decent fit in it. I just stuck my "go to" Baruntse inners in the shells..thinking I was set. The 6000's actual inner boot and the shells are both marked 45. But common in the dbl boot arena to not offer true half sizes and cheat on the sizing in general. My thought? Bastards! Trust no one, try the boot (any boot) on in person, verify your exact size with the liners and sox you intend to use.


Frankenstein? Both the Spantik (more so) and the Baruntse make me feel like I am walking on stilts. I gain almost a full inch in height. I am willing to put up with that because I know that the sole insulation is much of what keeps your feet warm in really cold conditions with crampons. It doesn't help my technical climbing though. You'll feel the difference on the 6000 and if you look at the photos you'll see the difference...almost a 1/2" less in sole thickness between the Spantik and the 6000 in some areas on the sole. I measured anywhere from .25" to .45" difference in total sole thickness between the two.


One of the interesting details I found on the 600 is the sole. No only are the lugs smaller and less of them than the single boot, Phantom Guide, but they have a totally different sole pattern. La Sportiva has taken good advantage of this idea as well. Where I really noticed it was in the La Sportiva Trango Series. They use sticky rubber and a technical sole pattern that can really enhance rock climbing.

The 6000 is on the left again. Check out the toe rubber on the 6000 compared to the full lug pattern on the Guide. I would have thought it would be reversed. But I am not complaining! A dbl boot that will out climb a single boot? And only 3 oz heavier? Hard to believe actually. Even ditching the original liner I am happy enough with the obvious advantages and fit of the 6000 shell that I will be using them next winter and spring. The real question is how will they hold up over a full years use? Check back for an answer on that one.


Crampons?

A good fit on the 6000 with the BD Sabertooth 'pons, BD asymetrical connecting bars and Petzl front bails.


Bill Belcourt @ Black Diamond is a smart guy, who climbs hard. He also oversees the climbing hardware dept. @ BD. So while were were both "wowed" by the weight of the 6000 at last winter's OR show he was wondering then about how the super low profile Scarpa soles on the new Phantom line would work with the BD crampon bindings. Rightfully so imo. The Phantom guide seemed to pose little problem with my hybred BD Sabertooths useing Petzl front bails and a the BD asymetrical connecting bar. But the 6000 is a jump on even the Guide's sole profile....as in a thinner and smaller profile toe. My BD Sabertooths do still work OK but my Patzl Darts and Dart Twins don't fit well at all...surprizing as I had understood Ueli Steck (Petzl sponsored) had some involvement in the boot design. So plan on having some time/effort/possible new parts for your crampons if you decide to go to the newest Scarpa boots.


Close up photo of a terrible fit, stock Petzl Dartwin 'pons on the front of the 6000.
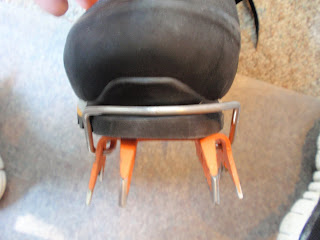


Sabertooth with the optional aluminum Neve' heel and the asymetrical bars.


And as of tomorrow my goal will be to own only two pair of dbl boots. I''ll let you guess which two.


Scarpa's spiel:


And be sure to note the one year warranty


"Give your foot a warm and sturdy platform to help you crush your next winter ascent when you lace and zip it up inside the Scarpa Phantom 6000 Mountaineering Boot. This fortress of warmth features a built-in zip-up gaitor for sealing out the skin-searing cold and a waterproof liner so your feet stay dry even on slushy snowfields in late May.

•The tough S-tech upper’s rubber rand holds up to the abuse any frozen mountain dishes out
•Toe and heel plastic rands secure your crampons as you begin a climb into the heavens
•Waterproof liner is beefed up with a layer of EVA foam and heat-reflective aluminum to keep the warm air inside
•Insole and midsole cushion your steps while staying sensitive enough to feel each foothold before you take the next
•Vibram Mulaz outsole grips the rocks and snow as you approach the icefall
•Ergofit System stretches in the ankle for a dynamic fit for aggressive ice climbers and mountaineers
•Removable Mountain Lite liner lets you dry the sweaty liners in your sleeping bag on longer expeditions to keep them fresh and unfrozen

Material:
Shell: S-Tech (Cordura w/ 10% elastane)
Lining:Waterproof-OD, Lorica, 5mm EVA, heat-reflective aluminum
Removable Liner:Yes Sole:
Insole: Pro-Fiber XT;
Midsole: PU, microporous EVA;
Outsole: Vibram Mulaz
Crampon Compatible:Yes, very low profile toe welt
Lacing:Lace-pull on lower boot, single strap velcro closure on upper boot
Zip-up gaitor
Weight:[Pair, size 42] 4lb 6oz (2000g)
Recommended Use:Ice climbing, alpine climbing, mountaineering
Manufacturer Warranty:1 Year

Friday, June 7, 2013

Once More with Feeling: the Return of the Winter Tire Dilemma

Snowy Streets, Cambridge MA

After last year's mild winter, this holiday season caught us off guard with a bountiful snowfall. My two ridable transport bikes at the moment are a Brompton and a 650B prototype mixte (more on that soon). The mixte sports 42mm Grand Bois Hetre tires, and so I thought it would be a great idea to ride it in the snow. After all, the Hetres ride so nicely over unpaved, uneven terrain. Crusty snow feels kind of similar. I took to the streets.


Here I will pause to admit, that despite 3 previous winters of cycling behind my belt, I had never before ridden on roads that look quite like what's pictured here. There was never a need to, since our neighbourhood usually gets plowed and salted pretty thoroughly. Typically the streets look morelike this-with snowbanks piled high on the sides, but the travel lanes mostly cleared. This time around, maybe on account of the holidays, they had not cleared the snow all that well. I got to experience the real deal.


Snowy Streets, Cambridge MA

The snow on the roads created terrain of three distinct categories. There was the even, packed snow. Riding on it felt similar to riding on post-rain dirt roads, nicely packed and kind of softish. The Hetres handled well there. There was the crusted-over snow, uneven and slippery at times, though not outright icy. This too felt manageable. And then there were the occasional stretches of deeper, slushier snow. I expected it to feel similar to mud, but it was way more slidey and my front wheel kept fishtailing. Still, overall I thought that the tires did fine. There were only a few stretches where I felt uneasy, and I attributed that to a lack of confidence.


So I got home and uploaded some pictures of my snow ride, planning to comment on how decently the Grand Bois Hetres handled. But promptly the pictures received feedback from others to the opposite effect, warning that these tires ride poorly in the snow. The fact that I happily rode them and felt they were fine strikes me as funny - in a concerning sort of way. Ideally, I'd like to be able to tell the difference between lack of traction and lack of confidence.


Snowy Streets, Cambridge MA

And so, once more the Winter Tire Dilemma is upon me. Naturally, everyone is suggesting studded tires. This is my 4th winter commuting by bike and I have yet to try them. Partly this is because they are expensive and I cannot seem to commit to a wheel size. I am riding 650B now, but in winters past I've ridden 26", 28" and 700C, and who knows what I'll be riding next winter. I am also convinced that getting studded tires and mounting them on my bike will activate the Umbrella Carrying Principle, ensuring that I will not need them.


Finally, the very fact of having gotten through 3 winters without them makes me question whether I really need studs. Winters here aren't really that bad, and tires with some tread seem to do pretty well. The Schwalbe Marathon Plus are the husband's favourite for city slush and snowy paths alike, and they are even available for the Brompton's wheel size. The performance-oriented Continental Top Winter IIs also come highly recommended. Knobby mountain bike tires are another popular choice. One issue, as I understand it, is that no tire is equally good for both snow and ice. Studded tires help with ice, but not snow. Tires with heavy tread help with snow, but not ice.This winter, my commutes cover longer distances and more remote areas than previously, so a good winter tire is worth considering ...though with all the choices and factors involved, I suspect spring might come by the time I decide.

Sunday, June 2, 2013

Climbing Cold?


I spent 12 hrs out yesterday. Not a big deal but recognised a few things I think worth mentioning.

To climb in the most efficient clothing system I think you have to climb what I consider, "cold". You want to run your clothing system at a level of heat that is well short of sweating the majority of time. So you want to be almost a tiny bit chilled a majority of time if you stop moving. And everyone starting off should feel a tiny bit chilled.

Almost the perfect storm for me yesterday. Dehydrated from the day before and little sleep the night before. Too much to get done in real life so I could get away for the day. Sound familiar? Been nursing a bad knee for several a weeks and finally had another MRI done to make sure I wasn't risking bigger injuries and more down time. So I was tired from the chronic knee pain of the last couple of weeks and had been trying to ignore the massive doses of Ibuprofen which is what I needed to get healed up.

At the trail head there was a huge temperature inversion that we didn't recognize in the predawn start. We had gained 5000' and it was cold. Seemed reasonable.

So I bundled up. With all the wrong things happening in the last 48 hrs I didn't want to be cold and uncomfortable. Being tired, dehydrated and edgy from the knee pain I just didn't tolerate the cold well that morning. It should have been an alarm bell.

Couple of hrs later we were well out of the temperature inversion. It was above freezing now and we were in the sun. I was over heated, sweating and stripping clothes as we climbed higher in the glacier basin. 1/2 way into the walk I noticed 3/4 of my day's water bottle was already gone. That was a little shocking as I generally pay careful attention to how I go through my water. That was my first alarm bell to just how out of it I really was.

What I had brought for water would have just barely been enough if everything went perfectly and we summited in 4 maybe 5 hours. I'd be dehydrated but could easily suck it up till we got back to the car.

Then the final straw was it took a full 6 hrs of trail breaking just to get to our 1500' climb. We knew the game was over 3 hrs into the walk but pressed on anyway to at least see what we in such a hurry to get up. Time to make this one a "teachable moment".

Quick bottom line? I over dressed because I wanted to me more comfortable. Unnoticed, I drank my water quickly because I was dehydrated from the previous 24 hrs. I then over heated because I over dressed, carried more than I should have in gear and clothing and not enough water.

So now as I get even more dehydrated, I get cold feet from wet boots I sweated out from being too warm. Then I am getting cold again because I am dehydrated and physically tired and having to add layers I can't easily technical climb in. Things have gone down hill fast in 6hrs. But it all started 56 or 72 hours beforehand I just didn't recognise it.

Truth is I should have stayed home and gotten some rest and re-hydrated and waited a day or so before going out again.. I would have climbed faster and better if I had done so.

My thought is if you are physically incapable of "climbing cold" do yourself a favor and stay home. I let the weather and my desire to spend time with a buddy sway me. We all do it.

The better we can identify what goes wrong and why the easier it is to have a better trip next time.

Gearing up?

For the guys that are really good at alpine climbing I doubt they spend as much time at sorting gear as I do. But with less time to climb and generally more time to think about it I admit to putting in some serious overtime sorting and deciding on the gear I'll useonalpine trip with a planned bivy.


The guy pictured above might be the exception to that general rule. But Mark still climbed more than he wrote or ever talked. So may be all the "real" guys just talk about it less but obsess obout itbehind the door of their own gear closet.


As I was about to finish this blog piece I got a hearty laugh. Thank God I am not selling anything as this is actually the ultimate ad for what Dane thinks is thecool shit :) Take the choices with a grain of salt here. Simply my/our choices for the moment. Things continue to change.....and I am swayed by things like cost as well as function just like everyone else. But from all thechoices available to me (and the choices are trulyunlimited) this is what we are using for this trip.

Everything else being equal (and it never really is) and I have the chance, I look at the numbers first. How much does it weigh?


If you look at the shell test we are about to do (which isthe reason I came upwith blog entry) there are shells there that weigh from 5.6oz to 22.9oz. You can bet which one I will start off in when I need a shell. But if you kick out the highs and lows there the better shells for what I had intended to test will run between 13oz. and 19 oz. Which makes much more sense "everything else being equal".


http://coldthistle.blogspot.com//09/shell-shoot-off-mano-mano.html


I've had cold injuries this time of the year on Rainier's North' side. The option of dbl boots or the Batura is open to all of us. Doug and Lee will be in Baturas because they are easier to walk in and lighter than the best off the shelf doubles. I am tempted myself to take Baturas. Warmer than my Ultras but heavier as well.


Easier to climb in though than my Spantiks by volume and easier to walk in. The walk in is easy which we'll do in runners. That means I'll pack my boots from the car to 10K. When I weigh my Baturas and my Spantiks (customised with Baruntse inner boots) the difference is less than2.5 oz per boot...or 5oz for the pair. So themarginal addition of extra weight is worth the warmth and dry boots with a planed 2 days above 10K.


Nod at the moment goes to my Spantiks this time. I'll sleep better for the decision...but cuss the final 1000' of elevation gain on the walk up to Liberty Cap and over to Columbia CrestI suspect.


Crampons? I have a few choices but with heavy boots and a easierroute, a combo of the stainless Sabertooth front and a aluminum Neve heel seems appropriate for this climb. 10oz less a pair than the standard Saber so they are light. Because of the time of year for snow conditions (read cold and dry hopefully) and my questions about the durability/reliability of the stainless Sabertooth I have stripped the bots so I can more easily inspect the crampon for cracks. The other crampons being used are Doug's Petzl Dartwins and Lee's Grivels G22s.


I'm also taking along a lwt axe to supplement my Nomics (one CT hammer, new serrated pommel, ICE picksand no pick weights) on the easier snow climbing so even with out crampons I figure I could cut steps if a crampon failed. Doug has the New Quarks with CT accessories of course. Lee is using older Nomics, no hammers or pick weights. And we all have trekking poles.


At the moment with three of us in a stripepd Nemo TenshiTent a Feathered Friends Vireoseems like a good idea.


Two of us taking them. Lee is playing it smart and is taking a 2# Swallow. With Cascades Designs newest, high tech andsuper lightprototype NeoAir XTherm mattresses andthe tight quarters of the Nemo Tenshiwe should bewarm enough.


With all my gear hopefully stuffed into an admittedly small,25L Blue Ice Wart Hog pack.


Gloves between the three of us seem to be an equal split between Mountain Hardware and Outdoor Research with the odd pair from Arc'teryx thrown in. I'll get more specific on gloves later as it will consume an entire blog post. But Lee wants to take only one pair of gloves. I'll likely take three of differing weights. No sure what Doug will do. But those choices should be of interest with all the new models we have available from the three companies mentioned.


Doug and Lee will be in NWAlpine pants and Salopettes.I will either use NWAlpine Salopettes or the new Patagonia North Wall pant..depending on the tempsforecast between 10 and 14K and what I think will be required under them for longs.


Speaking of longs I am excited to try some of the newest technology (again a Polartec concept) in Cabela's E.C.W.C.S. It is aThermal Zone® Polartec® Power Dry® and might be much betterthan simply dbl layering my longs as I have done in the past to gain warmth in really cold conditions. Guess we'll find out soon enough with all three of us using the Thermal Zone technology.I had heard a rumor thatMr. Twightwas involved in the early design work on these.


The NWAlpine hoodies are a given for all of us as a base or mid layer. We have RAB Infinity Endurance 800 fill down jacketscomingfor a insulation layer.


I am hoping we can use the RAB high quality downgarments under/over these testshells and have the newest technology there WOW us with the performance.


Nastia climbing high on ourcurrent objective. (photo courtesy of N. B.)


Saturday, June 1, 2013

Joshua Tree National Park

It was on March 17th that I arrived at Joshua Tree National Park in Southern California, seeking some warmer weather. I wasn't disappointed though a few of the nights were a bit on the chilly side. Coming in on the southern side off of Interstate 10, east of Indio, I entered the park just as the visitor center was closing. The Cottonwood Spring Campground was just down the road a ways and it was there that I spent the night.

The next morning I stopped at the visitor center to get a map of the park and information on some of the trails. Half a mile from the campground was the trail to Cottonwood Spring. It was an easy walk along a gravely path and dry sandy stream. Arriving at the stream, there was simply a sign identifying the place where the Spring had been. Rather anti-climatic but it was a nice walk; the sun was shining and there was a nice breeze.

There were several other trails in the area but the southern part of the park, to me at least, wasn't all that interesting. So I hit the road and headed north where the Joshua Trees and the Jumbo Rocks were located.

Along the way there were a few things to see – the Cholla Garden and Ocotillo Forest.

The Cholla Garden was planted by Mother Nature. You do see the Cholla in other areas of the park but usually just a few hanging out together. Here in the garden they grow in abundance.

The cholla also have incredibly sharp, hooked needles that are difficult and painful to extract if you happen to get one stuck on you. I was very, very careful walking through that garden!

The Ocotillo are interesting also. They can get quite tall, this one was about 15 feet high. Much of the year it looks like a bunch of spiny dead sticks. But after it rains, the Ocotillo is covered with very small leaves. Like other deciduous trees, the Ocotillo loses it's leaves but not due to the changes in the season. Rather, for the Ocotillo, the leaves fall when there is no water. The long stems are often used for fencing material and for walking sticks.

The bright red flowers of the Ocotillo appear on the tips of the stems in spring and summer.

A “tube” of Ocotillo flowers.

Tuesday, May 28, 2013

Hoffman Family in Roann Cemetery

Located in Wabash County, Indiana one mile north of Roann on the east side of County Road 700W near CR 700N, the Roann Community Cemetery was formerly known as the I. O. O. F. Cemetery and even earlier as the Paw Paw Cemetery. There are four sections separated by roads that lead to a circle in the center of the cemetery. The markers for the family of Eliza Jane Wise and Anthony Hoffman are in Rows 13 and 14, in the north west section. As discovered in her obituary, Eliza was the daughter of Peter and Christina Wise, whom I believe are also the parents of Jacob Wise, my 3rd Great Grandfather.


The Hoffman marker in the foreground is that of Dayton Hoffman, to the right is the one for his daughter Helen. And to the right of hers is the one for Eliza and Anthony Hoffman. Behind and to the left of Eliza's marker is her daughter Ella Hoffman. And to the left of Helen is the marker for Effie and John Wertenberger. The large stone facing the road is the Gidley family monument. This picture was taken towards the end of my time in the cemetery and the rain was coming down in a steady stream instead of just drizzling, as it had been earlier in the day. Photographs taken on February 5, .. by Becky Wiseman.


The east face of the marker for Eliza Jane Wise and Anthony Hoffman.
A. W. HOFFMAN / DIED JULY 5, 1902 / AGED 64 YEARS
E. J. HOFFMAN / DIED NOV. 2, 1920 / AGED 78 YEARS


ELLA HOFFMAN / 1870 - 1918
Note: Ella was the daughter of Eliza and Anthony Hoffman. This stone is north of the Gidley marker and between the Hoffman and Wertenberger markers.


This is a huge monument, one of the biggest I've ever seen. Placed so that it faces the roadway that leads into the cemetery, it can't be missed. Which was a plus for me since it was one of the grave markers for which I was looking. The Gidley monument stands about seven feet in height, about five feet wide, and the base is more than 2 feet deep. Jennie Gidley was the daughter of Eliza Jane Wise and Anthony Hoffman. In the plots behind this stone are the markers for Eliza Wise Hoffman and her children.


The inscription on the south face of the Gidley monument:
ARAM GIDLEY / DIED / MAR. 5, 1923 / AGED / 79 Y. 8 M. 24 D.
JENNIE M. / WIFE OF / A. T. GIDLEY / DIED / AUG. 5, 1914 / AGED / 41 Y. 2 M. 7 D.


The inscription on the North face: W. W. GIDLEY / 1898 - 1974
EMMA / WIFE OF / A. T. GIDLEY / DIED / JUNE 1, 1892 / AGED 40 Y. 8 M. 18 D.
Note: Emma was Aram Gidley's first wife. Jennie Hoffman was his second wife.


at left: On the west side of the marker is the name WERTENBERGER.
On the east side: JOHN / 1853 - 1920 / EFFIE / 1866 - 1944

at right: On the west side of the marker is the name HOFFMAN.
On the east side: DAYTON / 1884 - 1940 / MARY / 1858 - 1905
Note: The year of birth for Dayton is not correct. He was born in 1864, not 1884.


HELEN O. HOFFMAN / 1892 - 1965
Note: Helen is the daughter of Dayton Hoffman.