When I last corresponded with Debra Banks, she was off to ride the Texas Rando Stampede 1200 - a 750 mile brevet that she would go on to complete in 85 hours. Naturally Deb did this on a Rivet: a waterproof, slotted leather saddle of her own design.
While Rivet saddles are fairly new to the scene, Deb's experience in the industry goes back to her time at Selle Anatomica. In her own words:
Tom Milton, the founder of Selle An-Atomica was my sweetie and after his untimely death, I ran SAA for a year while his estate was being settled. His family took over the company and I ventured out on my own to form Rivet Cycle Works.
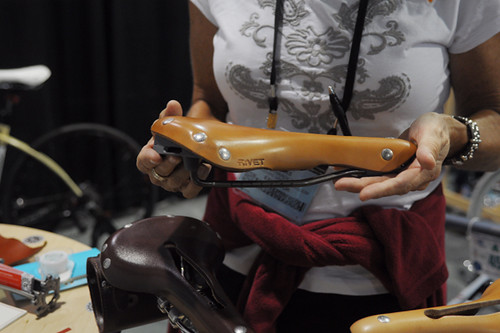
At the moment, Rivet offers three basic models of saddles in different widths. Each is available in a range of colours, and with a choice of cro-moly or titanium rails. We discussed my trying one for review and settled on the Pearl.
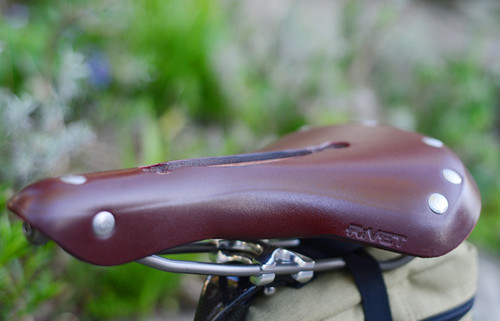
Named after Pearl Pass in the Rocky Mountains, the Rivet Pearl saddle was optimised for long distance comfort and support. As Debra explains, this does not mean these saddles are solely for long distance riders. Rather, if a cyclist experiences saddle discomfort when attempting longer rides, it was designed with addressing this in mind. The Pearl model features bag loops for attaching a full sized saddlebag.

Measuring 170mm at the rear, the width of the Pearl is equivalent to that of Selle Anatomica saddles. However, the shape and structure are quite different. In fact, while Rivet saddles may invite comparisons to Selle Anatomica because of the shared history, I find them to have more differences than similarities. The list of similarities is short: Both are slotted, and both are made of waterproofed leather in largely the same range of colours. However, the form and feel have little in common.
The first thing I noticed about the Pearl before fitting it on my bike was how tall it was. The height, or depth of a saddle is not a spec that all manufacturerslist, but it matters. While the Pearl's leather upper is in itself shallow, the rails are pretty deep. Installing it in place of my Berthoud Touring saddle, my seatpost had to be lowered almost a full cm to compensate. Selle Anatomica saddles are even shallower than Berthoud, so the difference there would be greater still. I am not comfortable providing exact figures, because height is difficult to measure and I don't want to misinform. But basically it's Selle Anatomica < Berthoud Touring < Rivet Pearl, with just under 1cm of difference in height between each.

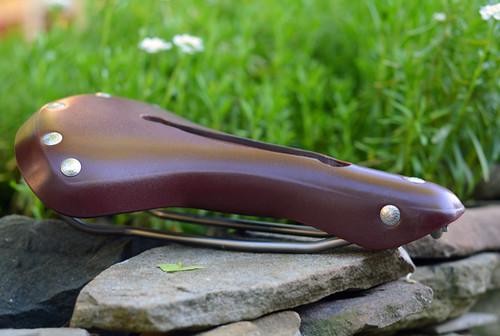
It occurs to me that the purpose of the deep rail design on the Pearl might be to avoid any chance of the leather hitting the rails should it stretch over time. There is certainly no danger of that.The wrap-around tab on the underside further reduces tension loss.
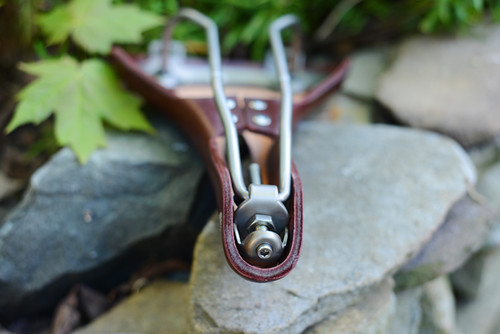
According to Debra, Rivet saddles can take about 300 miles to break in, during which time they may also stretch. The tension screw should be used to regulate tension - not just in the event of stretching, but also to find the tension that works best for the rider's anatomy.

The purpose of the slot on Rivet saddles is "to relieve pressure and help to re-distribute pressure to other areas, depending on how the rider sits on the saddle." The Rivet slot is a bit longer than the slot on the Brooks Imperial line of saddles, and considerably shorter than Selle Anatomica's.

The edges of the Pearl's sitting surface are crisply delineated, rather than rounded, which gives it a sculptural look. The "R"-embossed rivets add textural interest. The Burgundy colour, pictured here, is a deep brown with a magenta tint (and, from what I can tell, identical to Selle Anatomica's Mahogany).

For waterproofing, a chemical agent is mixed into the tanning process (a different process than what is used for vegetable tanned leather). To increase firmness and minimise sagging, a second layer of leather is laminated to the upper piece. The leather for Rivet is sourced from Wisconsin, then sent to Taiwan, where the saddles are made by a master craftsman. Rails and other frame parts are sourced from Taiwan. The saddles are assembled there and then shipped worldwide.

With the demo Pearl on my roadbike, I rode around the neighbourhood and determined that the standard (highest) tension felt pretty good. The rear felt just about right at my sitbones. The transition from rear to nose felt just a tad wider than what I normally ride. With this initial assessment I felt comfortable enough to try a long ride.
I tested the Pearl on an informal 100K. Including my ride to and from, it was an 87 mile day in the saddle. For me, the Pearl out of the box did not require a break-in period. I experienced no soreness over the course of this distance. The leather felt quite stiff, but suppler than my hard-as-a-rock Berthoud. Compared to a Selle Anatomica, the "hammocking" action was subtle, and I could not discern independent movement between the two sides separated by the slot.The curvature and surface of the Pearl's rear felt very comfortable as the miles rolled on. Once in a while I could feel the ridges of the slot toward the front. It was not enough to cause chafing in the course of the distance I did, but I wanted to note that I could feel them. What did cause chafing - and this started around mile 60 - were the sides of the saddle in that transitional part that tapers toward the nose. Given the location and nature of the chafing, this was not a breaking-in issue or a tension issue, but a structural issue - the Pearl model is slightly too wide for me in the rear-to-nose transition, which caused chafing to my inner thighs over time. Having received my feedback, Debra agrees with this diagnosis and suggests I try the narrower Independence model to compare.

As we all know, preferences in saddle shape, size and feel are highly personal. It is always good to have options and variety. Designed by an experienced
randonneuse, the saddles from Rivet Cycle Works are a welcome addition to Brooks, Berthoud and Selle Anatomica. The Pearl model is priced at $150 with cro-moly rails and $250 with titanium rails. In addition to saddles, Rivet also offers handlebar tape, mudflaps, and other goods. I wish Deb all the best with the business, as well as in her cycling adventures.
 The topic of climate change took exceptional relevance here at Mount Rainier after the floods and wind in November of 2006 caused significant damage throughout the park(check out the Mt. Rainier N.P. report documenting the flood's damage), forcing our gates to close. This was not the first storm that hit this park hard, nor will it be the last. There is a high likelihood that future storms will cause similar damage (if not worse) and climate change will have as-of-yet even greater undetermined impacts on the park's resources. The result of this event and uncertainty brings into question the ability of the federal government to sustain long term access to places such as Mount Rainier from an economic and ecological standpoint. Obviously, this issue has implications for us all - recreationalists, admirers, climbers, skiiers, and just anyone living in a town near the park.
 September 3, along with a panel of experts in climate change, outdoor recreation, economics, wildlife and roads and trail construction (among others). The evening's event, co-hosted by the Washington Parks and Forests Coalition, is titled, "The Way In: The Future of Access to Northwest National Parks". Panelists will focus on global climate change and how it will affect our national parks, especially Olympic, Mount Rainier, and North Cascades National Parks. This panel discussion is free and open to the public.


 The view from my campsite, looking northeast.
 Looking southeast.
 From the north side of the park, looking toward the west. The campground was nestled amongst the trees on the western shore.

 The Trail from the rim. At the top, just a little left of center you can see several lodges. The one at the rim is the Bright Angel Lodge and the trailhead is to it's right as you are looking at the picture.
 You'll have to trust me on this... The 1.5-mile rest-house is a short distance to the left of that longest pointy shadow. The 3-mile rest-house is at the far end of the trail on the lower left.
 Enlarged view of the previous photo, showing the 1.5 mile rest-house in the upper center of the photo. Actually, those are the restrooms, the rest-house is tucked away in the side of the Canyon, next to that shadow.
 The 3-mile rest-house is near the center of the picture, where the trail makes a sharp turn back, just above the “black spot” which is a steep cliff. Indian Gardens is barely visible on the far left (that clump of green trees).
 Enlarged view of the previous photo, showing the 3-mile rest-house (the small clump of trees where the trail splits to go out to the overlook and the restrooms).
 And finally, the trail into Indian Gardens and on out to Plateau Point. Of course, the Bright Angel trail continues on down to the River and the Phantom Ranch area. Where the Plateau Point trail veers to the left, the Bright Angel trail goes to the right.


 Padre Island National Seashore
 The sixth photo in the sixth folder of the sixth folder of my "Image Files" folder was taken at my grandpa's house in December 1954 and my sister Terry was just learning to walk. Mom has always said "It was her first step" but who knows. A rather appropriate picture though, seeing as how today (January 31st) is her birthday. . .