Tuesday, November 30, 2010

Ceci N'est Pas un Rando Bike

Rawland Nordavinden 650B

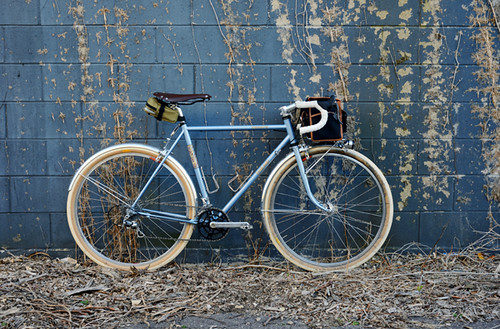
Last summer I test rode and reviewed a Rawland Nordavinden, which I liked very much. At the time I was waiting for a similar frame (a prototype project) to be finished and it was unclear when that would happen. Could be soon, could be in another year, as these things go. In the meantime I kept borrowing bikes to do dirt road rides, which didn't feel right. Soafter giving it some thought, I bought the Nordavinden frame for personal use and built it up as an interim bike, with components destined for my own frame. Long story short, but for now the Rawland remains.I got used to it, I like it and can't bring myself to dismantle it.


Rawland Nordavinden 650B

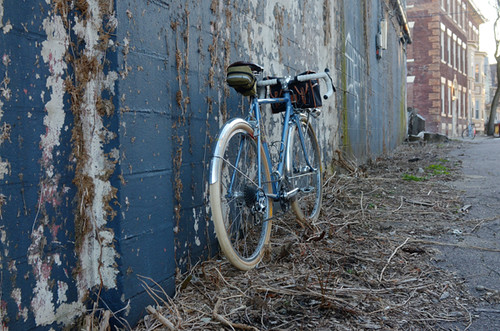
The frameset is the same one described earlier, so I won't go into detail again. But quick summary: It is steel, with thin wall standard diameter tubing and low trail geometry, made to fit 650Bx42mm tires and to accommodate sidepull or centerpull brakes. The way I set up this bike is considerably different from the demo model I tried last summer, so I'd like to share my impressions of this version.


Rawland owners have their own newsgroup called rCOG, which I browse with interest. One common theme I've noticed there is that they like to keep the weight of their builds down. I did this to some extent as well, but didn't take it as far as one could. For instance, I went for lightweight wheels, but didn't fret as much over the other components. Still, the bike - before fenders, front rack or handlebar bag, but including saddle, pedals, bottle cages and bar tape - weighed a respectable 22lb, according to Harris Cyclery's scale. Once the final accessories were added, the weight rose to 25lb. That is not bad for a bike of its type, though it's possible to do better (for a price).


Rawland Nordavinden 650B

The wheels were built around Pacenti PL23 rims, with a Schmidt SON dynohub in the front and a White Industries rear hub, with a Campagnolo road cassette. The tires are the 650Bx42mm Grand Bois Hetres. Some have pointed out that this bike looks like it has fatter tires than the one I tried last summer, but that's only because these are cream and the others were black. White tires tend to look larger; it's an optical illusion.


Campagnolo + White Industries

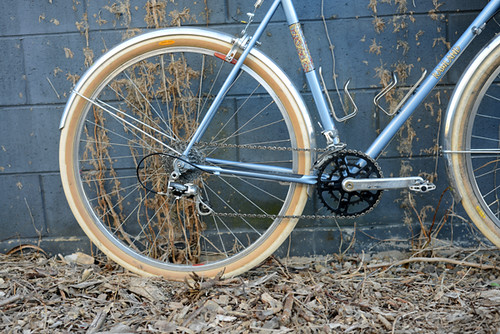
The drivetrain is a hybrid of older Campagnolo Chorus (not sure what year, but it was when Chorus was still a 10-speed group), and a White Industries VBC road double. The goal here was to achieve super low gearing without weighing down the rear wheel with a mountain cassette, as well as allowing me to use my favourite shifters. As far as smoothness of operation and reliability, the setup works okay, but I would not go so far as to recommend it (or any other hybrid drivetrain I've tried to date) to others. More on this in a later post; it could be a bit of a rant.


Rawland Nordavinden 650B

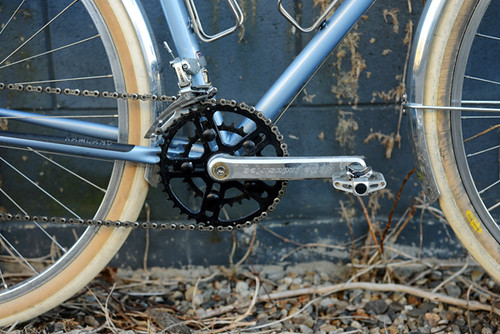
But as far as gearing, the setup is heavenly. I have 42/28t rings on the crankset, and a 12-29t cassette in the rear. On pavement, I mostly use the big ring, and it provides a decent range. On dirt, I switch to small and it also provides a decent range. Having a sub 1:1 gear is wonderful. I tend to pedal at a high cadence, so climbing hills on an overgeared bike is a sure way to dampen my enjoyment of a ride. With the low gearing here, my legs always feel good on climbs; I feel like I could go anywhere.


Paul Racer Centerpulls

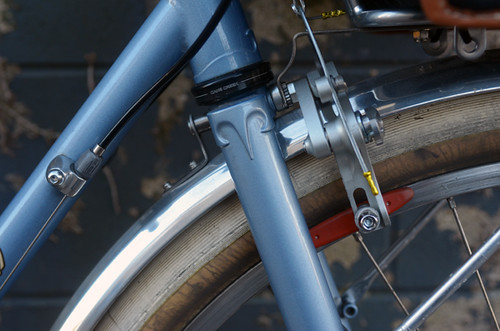
The brakes are Paul Racers, and I reviewed them here. Honjo fluted fenders.


Selle Anatomica, Jandd

When riding on dirt and gravel, I prefer the Selle Anatomica saddle for the extra bit of give it provides. I've reviewed SA saddles before (here and here), but might need to post an update.


Mark's Rack, VO Handlebar Bag (Modified)

In the front I have a Nitto Mark's rack and a modified VO Campagne handlebar bag, which I use as a camera bag. The headlight is a Schmidt Edelux, on a DIY bracket. I have not installed a dynamo tail light yet, but when I do it will be the Spanniga Pixeo.


Rawland Nordavinden 650B

Cane Creek headset, Velo Orange stem, Grand Bois Maes handlebars, Cinelli cork tape. In retrospect, I think the white tape was an aesthetic mistake on this bike, but I'll keep it while it lasts.


Rawland Nordavinden 650B

Not clearly pictured here are my Crankbrothers Candy pedals, and King bottle cages (made by these guys), with Lezyne mini-pump attached. When I ride this bike, I typically keep tools in the saddle wedge and camera stuff in the handlebar bag. If I were doing a multi-day trip, I would substitute a large saddlebag for the wedge. I do not plan to install a rear rack.


[image by Pamela Blalock]


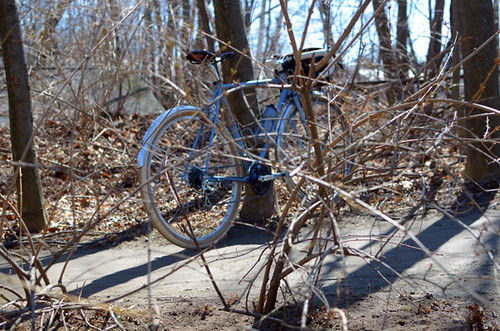
The role of this bicycle seems to confuse a lot of people. I've been repeatedly asked why I did not ridelast weekend's Permanent on it, since it's the prototypical "rando bike." But it's not a rando bike, at least not to me. I prefer to do paved rides - be they short or long - on my lightweight skinny-tire roadbike. On pavement, my roadbike is faster and feels better; I get less tired and find it easier to keep up with others. This may not be the case for everyone, but it is for me. However on dirt and gravel, this dynamic changes and a fat tire bike feels both more comfortable and more efficient. I also find the Rawland's distinct handling to be helpful on twisty unpaved rides, which in turn allows me to ride more confidently, relax and enjoy myself more.


So the Rawland (and any similar bike it might eventually be replaced with) is for unpaved riding. It is also a "camera bike," for long rides where I go exploring and photo-scouting. These two use case scenarios sometimes, though not always, overlap.The frame feels springy, but not noodly.A full handlebar bag does not seem to impact handling in any noticeable way, but the bike also handles just fine without it, as well as with weight on the rear only. In general (another rant-inducing topic best saved for another post), I am coming to the conclusion that handlebar bag setups are unnecessarily bulky and troublesome. I would not go this route, if it weren't for my desire to carry heavy cameras on the front of the bike. That said, I enjoy my setup, despite the trouble it took to install everything to my satisfaction and the extra weight.


I've now had the Rawland since September, though I did not ride it for a period from January till late March due to snow. My favourite things about it are the handling, and that it allows me to carry my big cameras in the front. It is a fine bike and a fun bike - though I'll be remiss not to note that others who try it don't always like it; the phrase "hinged in the middle" is used. It seems the low trail thing is really a matter of taste (and/or of getting used to).


Tangles

With unpaved rides becoming more popular than ever, lots of cyclists are looking for appropriate bikes and the Rawland is a great option. In addition to the Nordavinden, there is now also the Stag model, which is made forcantilever or v-brakes, and for 650B wheels in all sizes (whereas only the smaller Nordavinden comes in 650B). And for an entirely different take on bikes for unpaved riding, watch for an upcoming review of the Honey Cyclocross bike.

Monday, November 29, 2010

Snowshoe hike with Wolves


I went for a snowshoe hike with a couple of friends today and at one point during our hike I was looking further up the trail when, several hundred feet in front of us, I saw two Wolves run across the trail. All I had with me was my little Canon G11, so not a very good zoom but nonetheless I got the camera ready just in case we saw them again. I kept my eyes on the trail where I had seen them cross, and after only a few seconds one of them walked back out onto the trail and looked at us, then ran back into the woods. Just after that, the second one came out and gave us a look as well. Both of these photos were taken during their second pass across the trail. Due to the distance and not having a good zoom, I had to crop waaaaaay in on the photos in order to see the Wolves decently, so the image quality here isn't the greatest but it's still a nice account of our experience!


Sunday, November 28, 2010

Double boots


I have probably spent more time in plastic double boots that any other style of mountain boots. Two decades to be exact. I was climbing in leather single boots before that for the most part with the occasional foray into leather doubleboots. But the older and better double leather boots were heavy. Really heavy even compared to a good single boot and a Super Gator.


So what I ended up with was a very good pair of leather single boots (Haderer) and a custom pair of Carmen/ChouinardSuper Gaters that weremodified by addingmore insulation (synthetic pile) and a zipper down the front that was backed with flaps and Velcro.


Once I got into a pair of Kolfach Ultras (shown above) I never looked back. Even if that did require a few layers of mole skin every week during the first winter season climbing andguiding in them.


So 30 years later you might ask how did those original plastic boots compare to what we have now? A recent conversation on a Internet forum made me ask the same question myself. But this time I wanted a more complete answer. Some times we get caught up in the newest, lighter, better, warmer and eventually more expensive product and loose sight at what we once had. It is called institutional memory. This blog is one way I have tried to keep our climbing history and its institutional memory alive.


Sometimes it is not better to reinvent the wheel every few years. It might actually be better to build a better tire for that wheel and take advantage of the best technology first.


If you look at the original idea behind double boots the biggest advantage is to keep your boots (inner boot at least) unfrozen and if required dry on multi day outings. You can put the inner boot in your sleeping bag and dry it out over night or at least keep it from freezing if needed.


The disadvantage of double boots is that they add volume to your feet. Volume means extra warmth everything else being equal. But as we all know nothing is ever "equal".


So if we have a huge volume boot you have warm feet. A Sorel or other double layer cold weather bootsare a good example.


Warm butseverely lackingon most technical ground.


So what is really required is a certain level of warmth but at the same time the real key is to keep the over all volume of the boot as compact as possible so it is easier to climb technical ground in.


Make sense?


Big volume for warmth.


Small and sensitive to climb technical ground in

So some where in between we should be able to come up with a double boot that is both warm and sensitive. But it isn't as easy as you might first expect.


A multitude of materials to make a boot from these days. Plastics, fabrics and the old stand by, leather. And all have advantages and disadvantages.


So first I think to have the best boot you need to look at the last. The last describeshow the boot interior is shaped. Currently we have literally bath tube shaped lasts (some plastics) and very ergonomic shaped lasts that match the foot almost perfectly (again some plastics). And boot lasts that are every where in between.


In the old days a cobbler or boot maker would have literally hundreds of hand carved lasts. Once measured and your foot matched to a specificlast the boot fit could well be phenomenal. With the ability of good leather to mold to your feet the fit just got better with use.


With a boot built to your foot the amount of insulation added to the bestdouble boots simply made the warmer. With a generic boot last the boot just got heavier than required and may or may not have gotten warmer for your foot.


The answer for that was "give them a bath tub" and let the inner boot take up the slop. That would give you a warm boot if the inner boot and bath tub last actually fit your foot. But it was also heavier than required if the last had been done correctly to fit your foot.


It is not happen stance that the best lasts on good leather double boots like a Haderer double or a plastic boot like theDynafit TLT look like your foot.


This isthe best example I can easily show you of what I am trying to convey on boot lasts. The Koflach Arctisis over size and bath tub shaped. The TLT 5 is very anatomical lasted. Even with just a ski boot sole the TLT5 is easier to climb in for feel.


I have heard a great manycomments on how cold the TLT Series of boots is compared to other down hill ski boots. I'll challenge those comments. You really need to look at the amount of insulation before you start to make comparisons for warmth.


How do youmake a boot warmer the easy way? Add volume. This is the answer from Kolfach with two different boots, both the same marked shoe size. In this case a 11.5 US.


So let me back up a bit here.


I have summited Denali a couple of times in Koflach Ultras with foam inner boots and simple nylon knee high gaiters. I have also turned aroundat 17K on Denaliin really cold temps with the same boots and had really cold feet. But the issue wasn't that I didn't have warm enough boots. I did. The reality was the temps were too cold for me to be climbing.(no one else summited that week either btw) My feet getting cold were just the first sign of that cold. That and a thermometer that bottomed out during the night at 17K.


So when it comes to double boots I think there is a distinct disconnect between what the manufactures make us and what we really need.


La Sportiva Spantiks seem to be the most common boot for winter climbing in Chamonix by a huge margin.

Some type of double boot and generally a insulated over boot seems tobe required (or at least suggested) for Denali. More likely a Olympus Mons can be used above 14K on Denali in early spring and over kill later in the season. And a Spantik won't be enough boot for Everest or K2 or winter climbing in the Himalaya. There are and should be options forvolume and sensitivity.


Current Koflach "Guardian"But actually the last gen Ultra shell, which was/is an excellent boot.


If a 30 year old Kolflach Ultra will get you to the top ofany Alaskan peak, and keep your foot warm and dry how much more warmth do you need? My answer would be none. If I need a warmer boot I can use a Spantik or a Scarpa 6000 which both have a bigger volume. The Spantik slightly larger than the 6000 by what I can tell. And just a tiny bit warmer as well form my experience. But when you start getting cold feet in either of these bootsisn't going to be a boot issue but your hydration and food intake is my guess. The Olympus Mons and its close mates made by other brands are the next and final step up for cold feet btu the boots are huge!


So what I think is missing is a totally different boot.


One with the volume or something similar to a old Koflach Ultra or better yet the newest TLT 5s.


Modern material, fabrics, plastic, leathers,open and closed cell foam all make great materials to work with. San Marco made a single boot in the '80s that had a plastic lower and a leather upper. It would be easy enough to come up with something similar now. Think of a Nepal Evo with an anatomically cut plastic lower and leather upper and a thin, easily heat formablefoam inner boot?


It is a boot that would easily replace the Spantik everywhere but Denaliand the greater ranges. But perfect in the rest of Alaska or Mt Blanc most of the year. I suspect it would bethe boot of choice for everyone from the Canadian Rockies to Chamonix if done right.Basically a boot that we all really need but that no one has even thought about making. Might be because simply no one asked until now.


These days I don't care how good the outer boot is or how good the anatomical shape of the last is. If your inner boot isn't easily heat moldable you are behind the curve.The liner needs to be air permeable as well. We can do better than a VBL. But the innercan not retain any moisture. It is possible. But itis frustrating to see all this technology out there and no one taking advantage of it. I think it is too easy for the boot designers and manufactures to get tunnel vision. instead of going back to the basicsand requirements at thedrawing board level


A short design list for the new doubleboot I want made:


Less over all volume, more akinto a high quality technical single boot.

Double boot so you can dry the inner or keep the innerfrom freezing

simple inner boot lace system for fit

Lace system for the outer shell so it is one handed and most importantly reliable (no Velcro it wears out)

Anatomical last on both inner and outer so you use what insulation you do haveto best effect

Plastics and synthetics for the lower boot for waterresistance.

Upper of fabric or leather for a close and flexible ankle fit

Split the insulation between the inner and outer boot so the fit can be optimised in the inner but the outer offers good insulation above and below the sole

Use the smallest sole lugs and stickiest rubber technical climbing soles possible.

Honey comb carbon mid sole for rigidity long term and most importantly warmth through the sole


As much as I really like the "super gater" boots they are a design dead end. All of them. Simple reason. The newest pant fabrics allow the pants to be easily used as a breathable gaiter now. Adding a gaiter, no matter the material, slows the moisture coming out of the boot and slows theevaporation. So the attached gaiter is not a help in design as you might first think,


Our climbing clothing, from boots to hats are really now more than ever a system. Attached hoods on the base layer, help us eliminate one additional layer. Mid layers with attached hoods allow us to use a lighter mid layer for warmth.


Boots and the gaiters we use are a part of that system as well. As are gloves and the gauntlets on the gloves and seals on the jacket sleeves.


Gaiters on the boots aren't required and in fact lower the performance of the boots. Remember the basics..."you must stay warm to stay dry". Adding a feature that keeps you from staying dry or thatslows the drying is a feature you don't need.


double click this one to see them all


Any of the current boot makers have all the technology to make the boot I describe and market it for $700 or less than the current price tag requires on some of the boots today.


These are the two lightest true mountaineering boots available that Iknow of.


La Sportiva Trango Evo Extreme GTX 2#3oz 992g

Scarpa Phantom Ultra new model 2#3.5oz 1006g


1000g or less in a size 45 four season mtn boot is a magic number.


Here is the list and pictures of the current double boots that I can lay my hand on easily.

And a few odd ball combinations that I have used. Check out the over all weights and the inner boot weights.


I know it is possible to build a light weight technical double boot in my size (12 US/45/5 Euro) that would come in under 1000g per boot. And be the warmest and best climbing technical boot currently available. But I am shocked no one is doing it yet.


Euro size 45.5

La Sportiva Spantik 1370g

liner 252g


La Sportiva Spantik with a Baruntse liner1290g

liner 172g


La Sportiva Baruntse 3#2.5oz / 1503g

liner 172g


Euro size 46

Scarpa Phantom 6000 newmodel 1230g

liner 234g

Scarpa Phantom 6000 Baruntse liner 1200g

liner 172g


US size 11.5

Scarpa Omega 1110

liner 140g


Scarpa Inverno 1450

liner 318g


Koflach Arctis Exp 1440

liner 462


Koflach Degre 1160

liner 184g


Koflach Ultra (1980 vintage, white) 2# 10oz or 1190g total

Kastinger foam liner 234g


29.5 Mono

Dynafit TLT 5 Performance size 45.3-29.5 mono, (no tongue)1210g

TF liner 232g


TLT 5 Mountain TF 1200g (no tongue)

TF liner 232g


All the current double boots are within ounces of each other. 1110 being the lightest..the Scarpa Omega. And the Kolfach Arctis the heaviestand likely the biggest boot by volume@ 1440g. Volume wise the Arctis compares to the Spantik. And is bigger imo than the 6000.I am still impressed by the original Ultra now called the "Guardian" by Koflach. Sadly it seems to be soldover sized with the Arctis' liner. That shell, properly sized, with an Intuition liner would still be one of the best climbing boots available and around the 1100g or less instead of the 1258g Koflach lists.


More here on the Kolflachs:


http://www.koflach.com/en/parsepage.php?tpl=tpl_index


More on Scarpa's plastic boots here:


http://www.scarpa.co.uk/Products/Mountain/high/


Bottom line here? Some really good cold weather boots available today and all of them climb well on ice. The price point of the plastic boots make them a reasonablealternative if the $700+ is a little hard to swallow on the most popular models.


I have been turned around with cold feet but I have never been turned around on technical ground because of wearing plastic boots. The temps that did stop me would still do so in a Spantik or a 6000 today. I found it easier to climb 5.10 rock in a pair of the old Ultras than I do in the bigger volume Spantiks.The reason is simple..less volume means a better climbing and easier to climb in boot. Plastic boots make sense on hard technical rock or vertical ice in cold conditions if you can get a decent fit in them. If I could get my hands on a pair of the current production Koflach Guardian's easily, I'd be climbing in them this winter instead of my 6000s or Spantiks.


That doesn't say a lot for the current state of the art in double boots imo when a 30 year old boot technologyand1/2 the retail price of the upper end "state of the art models" available is thebetter option most days out today.


I'm lucky enough to have almost any double boot available to me. But if I had to choosejust one pair of mtn boots for every condition, any seasonand mtn range...it would be a rather old school pair of whiteplastics from the current Koflach production run.


If the idea of a ultra modern, super light weight and lowvolume double boot interests you, make sure to add your own comment to this blog post. More on the idea here:


http://www.ukclimbing.com/forums/t.php?t=475986


Tuesday, November 23, 2010

Ice Mountain


Another shot of the ice piles that were lining Grand Portage Bay before last weekend's winter storm. This pile of ice was maybe 4 or 5 feet tall, and I was laying on the ground on my side to get as low of a perspective as possible in order to make the ice pile look as large as possible. It would have been nice to have a blue sky or some more interesting clouds for a background, but this is what the sky looked like on the only day the ice was there before the winter storm hit. After the storm, the ice piles were diminished considerably thanks to the pounding waves from Lake Superior.

Monday, November 22, 2010

Vroom Vroom: Indy at Barber


We spent the weekend at the Barber Motorsports Park in Birmingham. Friday we roamed the park scoping out the different viewing spots, before finally coming back to our old favorite under the trees (on the straight between turns 11 and 12).


Various car clubs gather at the races and park in "car corrals". My husband wished he could take one of these Vipers home with us.


Although not the headliners, two Grand Am series races were also held this weekend, and turned out to be a lot of fun, even though I didn't know much about them. I was surprised at how many of those racers' names were familiar to me though... Hubby loves to watch those "24 Hours of Daytona" type races, and some of it must have rubbed off on me.


Pirelli employee taking a break. (Tired tire girl?)


There was a "fan walk" for the Rolex Grand Am series on Saturday. You have to pay extra for a Paddock Pass, and we didn't have time to fully take advantage of it. But I really enjoyed being able to walk on pit lane. It's even narrower than it looks on tv.

The crews couldn't have been nicer -- we even saw them opening the car doors so little kids could look inside.


Hot Dog Boy was there on pit lane. I took the flyer, and still have no idea what that was about. But he was awfully cute.


In which I pretend to be part of the pit crew... I imagine that Fernando Alonso just sped by in his Ferrari. I held the pit board to give him vital info, since his radio was broken... (Never mind that he's in F1, a series that doesn't come within 1000 miles of this track.)


Marco Andretti demonstrates how to pass at Barber.

The one thing I really got SICK of hearing was how you couldn't pass at the Barber track. I must have heard it a hundred times, from Joe Schmoe in line at the Porta-Potties, to radio announcers, to some of the drivers themselves. (I saw Ryan Hunter-Reay by chance, the only time I didn't have my camera, and he was saying it too.)


Indy Lights drivers take turn 5 three-wide.

But it's really not true. There was not much passing, granted, and it may not be easy, but it is possible.

-----

Still more photos to process... more later!

Sunday, November 21, 2010

Arches National Park


Great morning in Arches... headed out well before sunrise so I could be at a vantage point that allows you to see Turret Arch THROUGH North Window... it's an awesome view. Once the sun came up and the first light started to hit the arch, the rocks just GLOWED. It was awesome. I shared the spot with a medium-format film photographer from Montana.


I spent a couple of days at Arches, which is a park that I do not like during the day... there are just too many people. Early in the morning and late in the evening, however, it is sublime. Last night in the park was incredible. It was so quiet you could actually hear yourself think. The intense quiet of this evening is quite a stark contrast compared to a couple of days ago in the photography blind in Nebraska, with the sound of several hundred thousand Sandhill Cranes filling the air. Tomorrow I'm off to Page, Arizona to photograph Antelope Canyon!


Above: Sunset hiker at Turret Arch